Digital HVAC Controller
Team Member Names:
Yue Pan, Zhou Lu
Georgia Tech, Spring 2021
Quick Links
Demo Video Link: https://youtu.be/D2i0VEtWlDY
Presentation Video Link: https://youtu.be/cG2J5QSIfjU
GitHub Webpage: https://cpa872.github.io/ECE-4180-Final-Project/
MBED Repo Link: https://os.mbed.com/users/cx872/code/4180-final_project/
Setup instructions
- Connect the wiring to the MBED as shown in the schematic section of this webpage. Then attach your power supply.
- Compile the Source Code repository on the MBED cloud compiler and download it to your MBED.
- Power on the MBED by connecting it to the USB port on the power supply.
- You can set the temperature by pushing the “Higher” or “Lower” buttons, or using a bluetooth remote (You must pair the smartphone running the remote app to the MBED’s Bluetooth UART Module. For detailed instructions, see this 4180 MBED Wiki Page about the bluefruit module.)
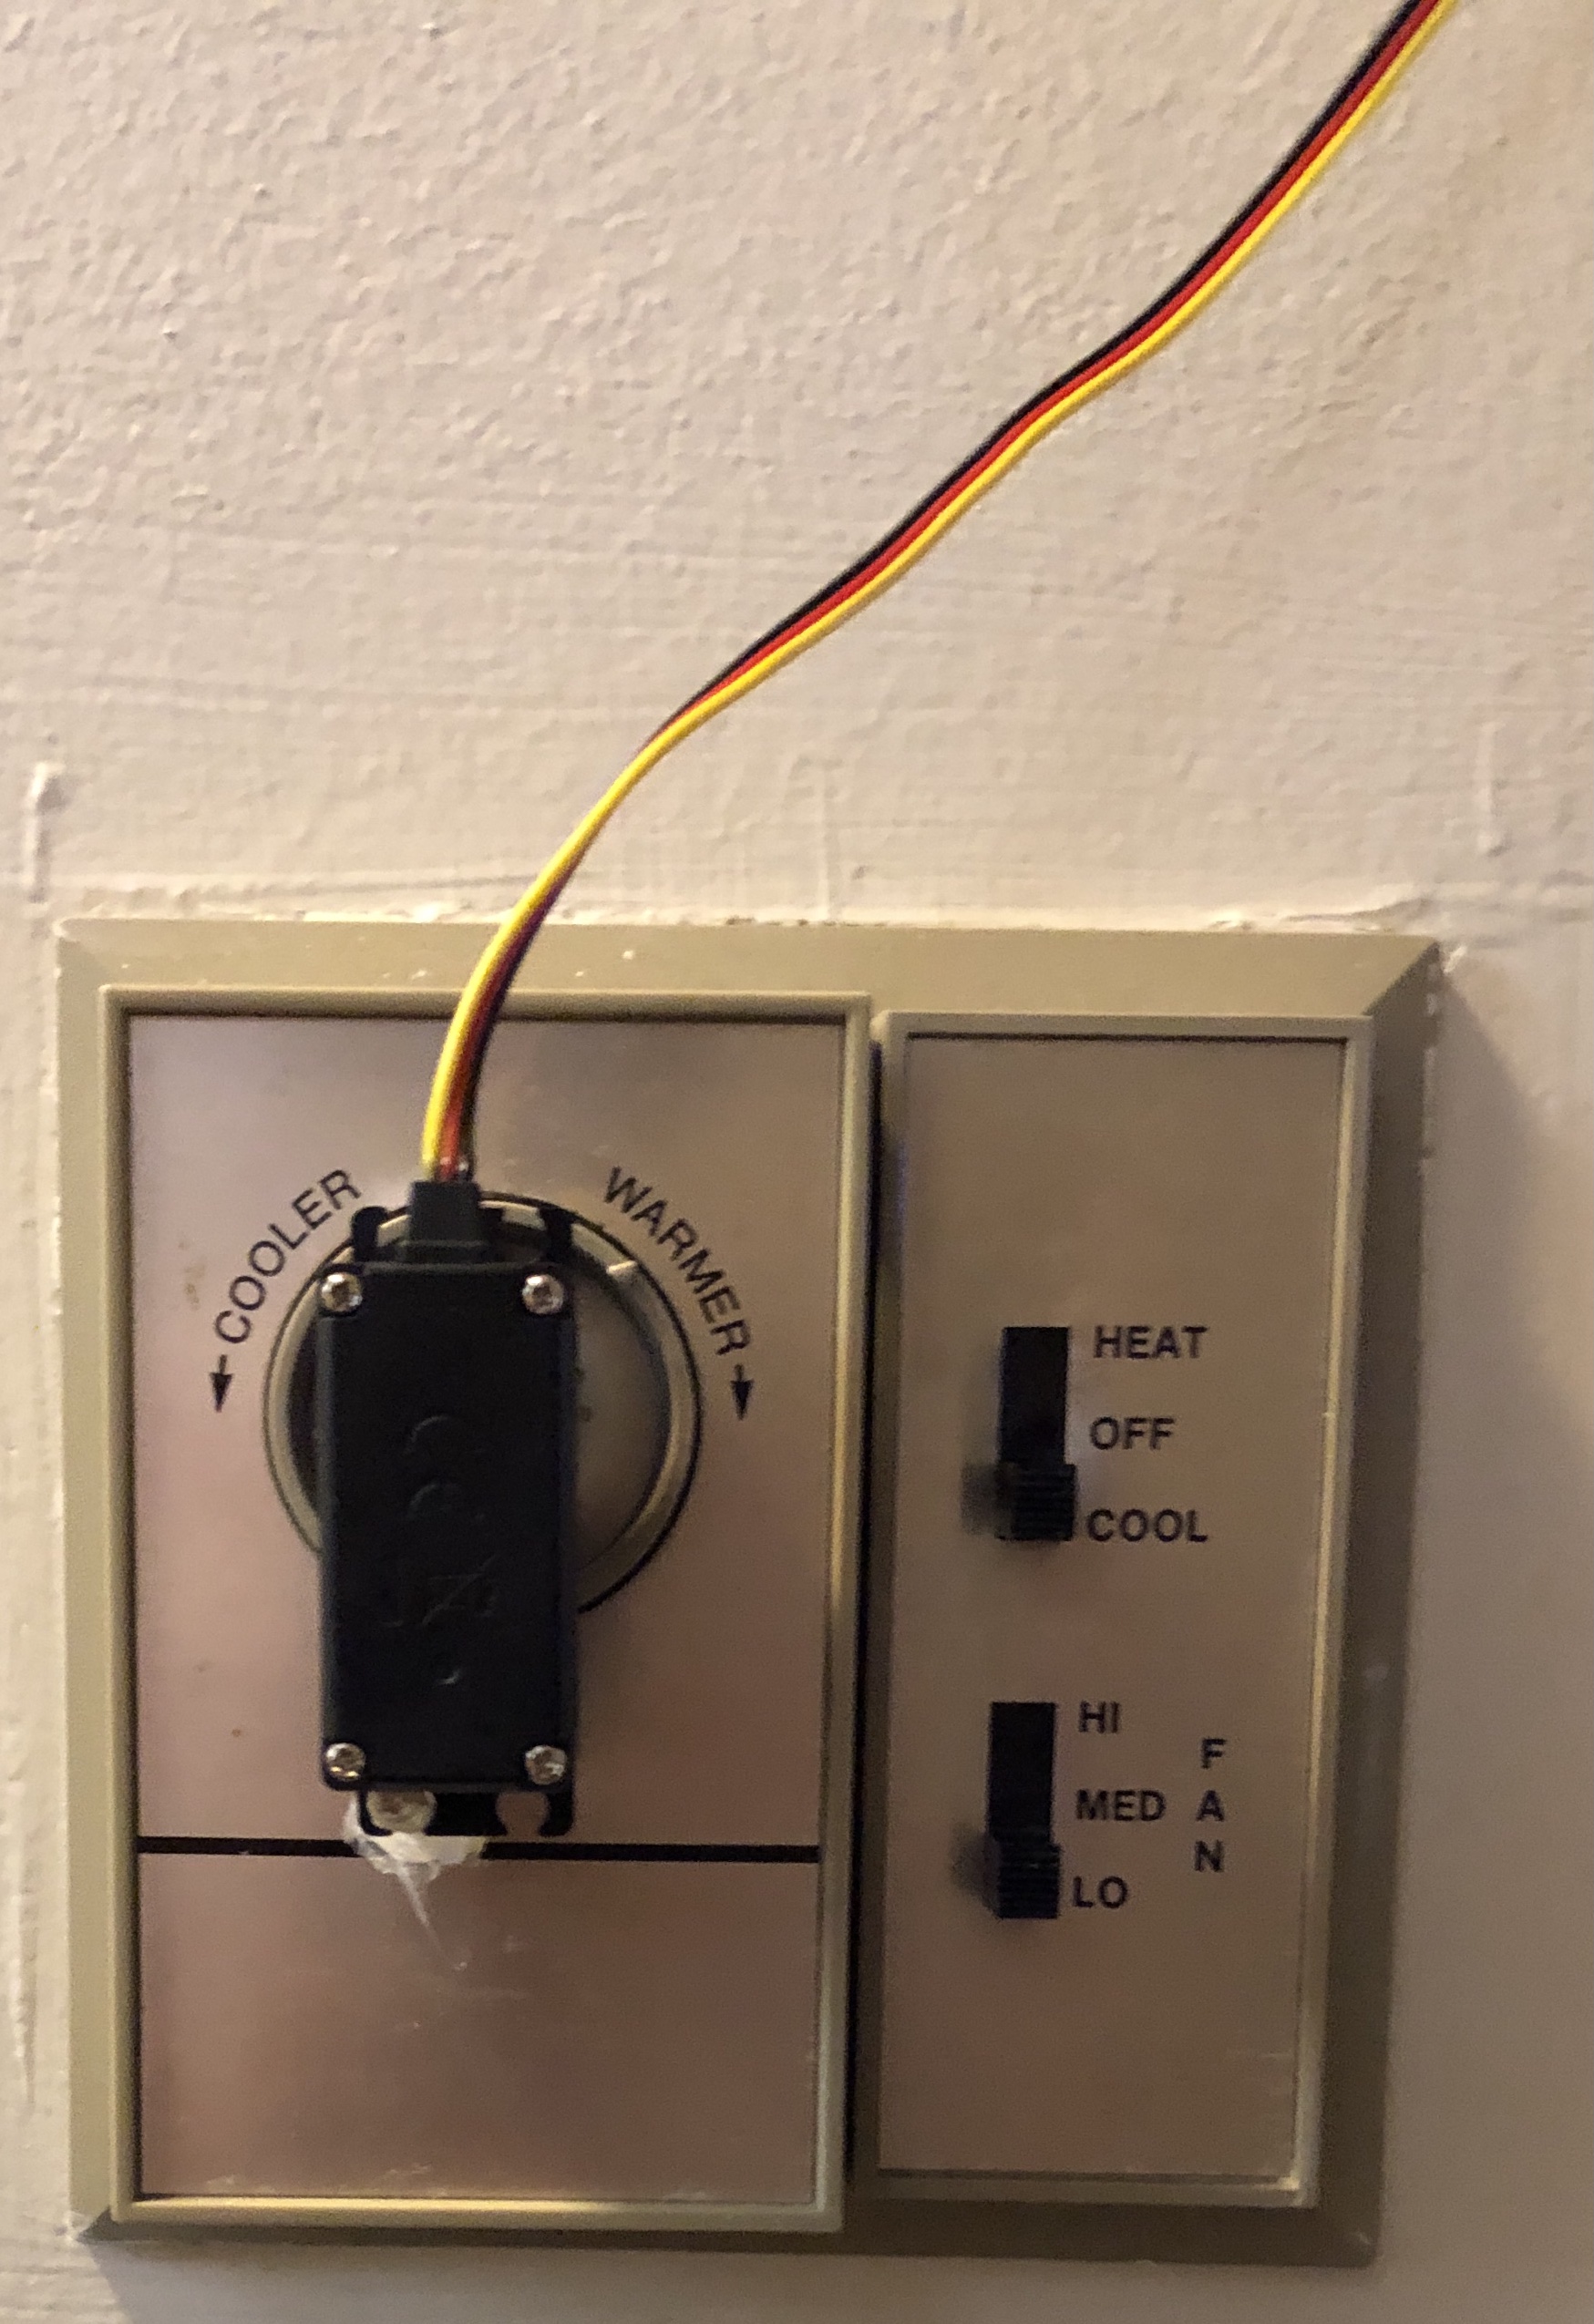
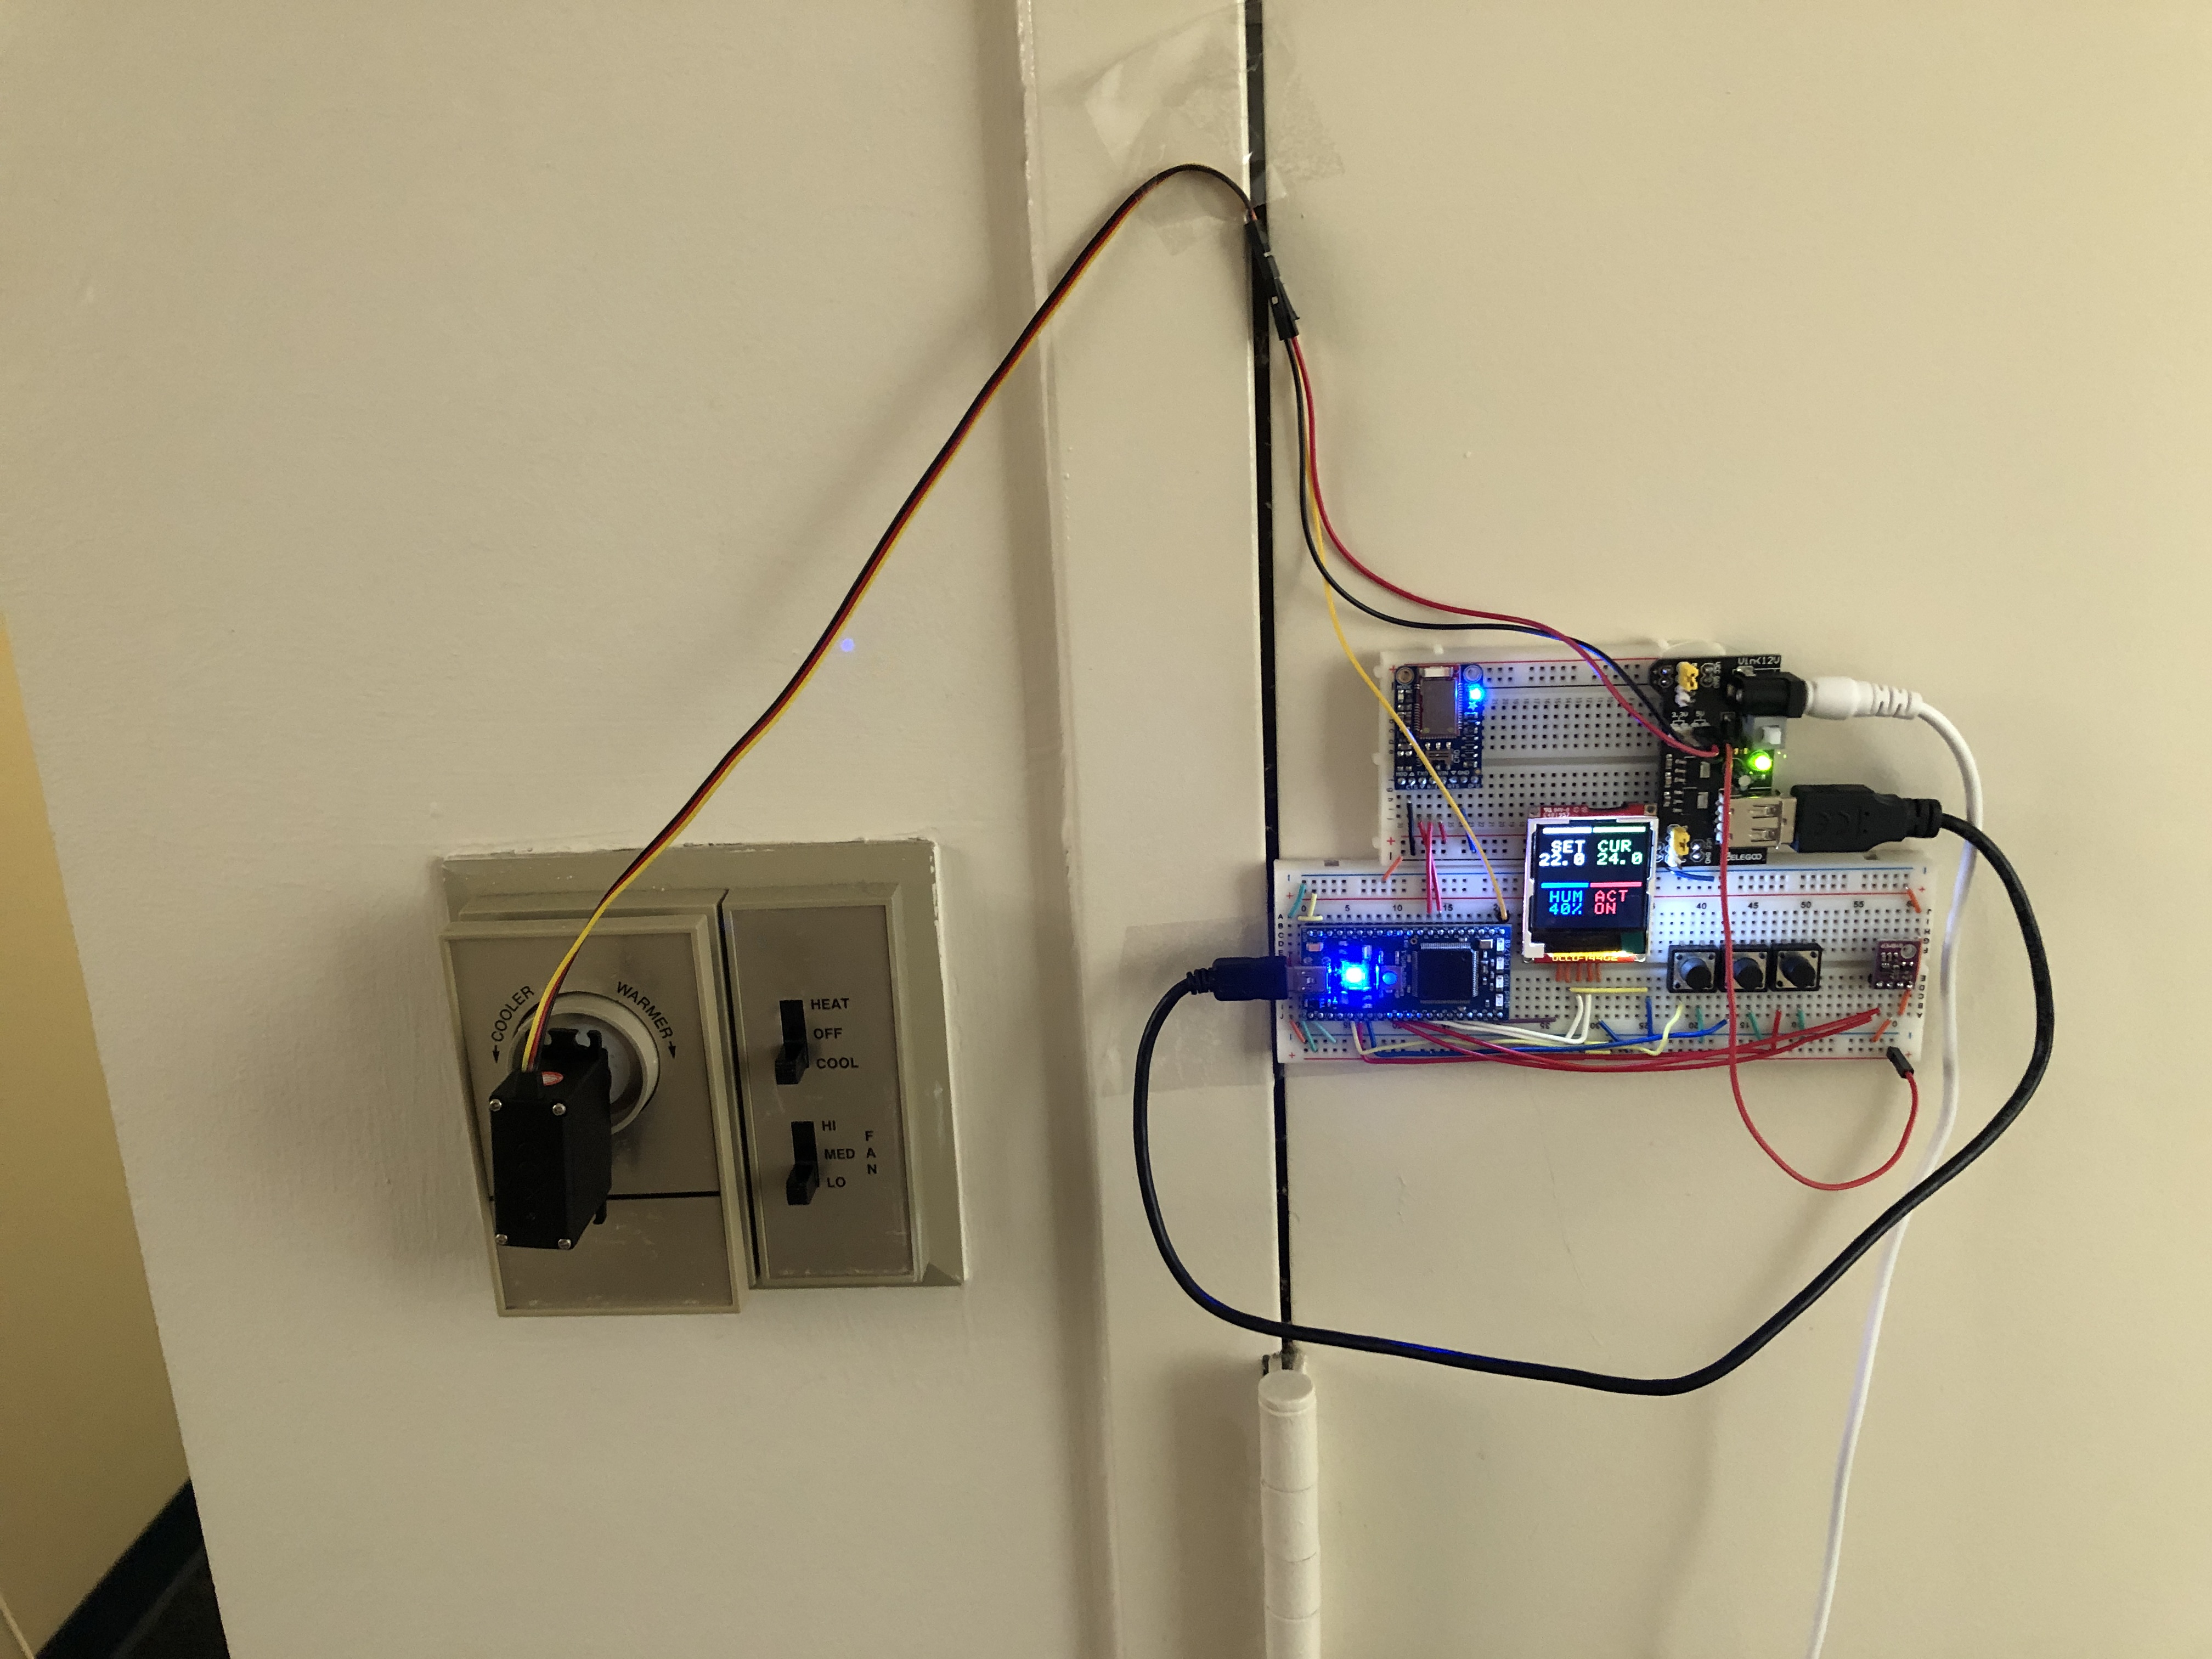
- Calibrate the device by setting your existing thermostat to the “almost on” position (i.e. any cooler and the AC will engage). Attach the servo to the thermostat and set the device’s Set Temperature to be the same as the “Room Temperature” indicated.
- You are now ready to use the device!
Note: To set the temperature using the Bluetooth Remote, please type set xx.x into the bluetooth serial port and hit enter, where xx.x is your temperature in celsius.
Motivation
HVAC Control in old Apartments (e.g. North Avenue East) is achieved through a wall-mounted knob. This can be inaccurate, with an unknown set temperature value and room temperature varying in a wide range wround the “set” temperature.
It can also be inconvenient, with no remote control. We addressed these issues with a temperature-sensing HVAC controller with bluetooth remote control support.
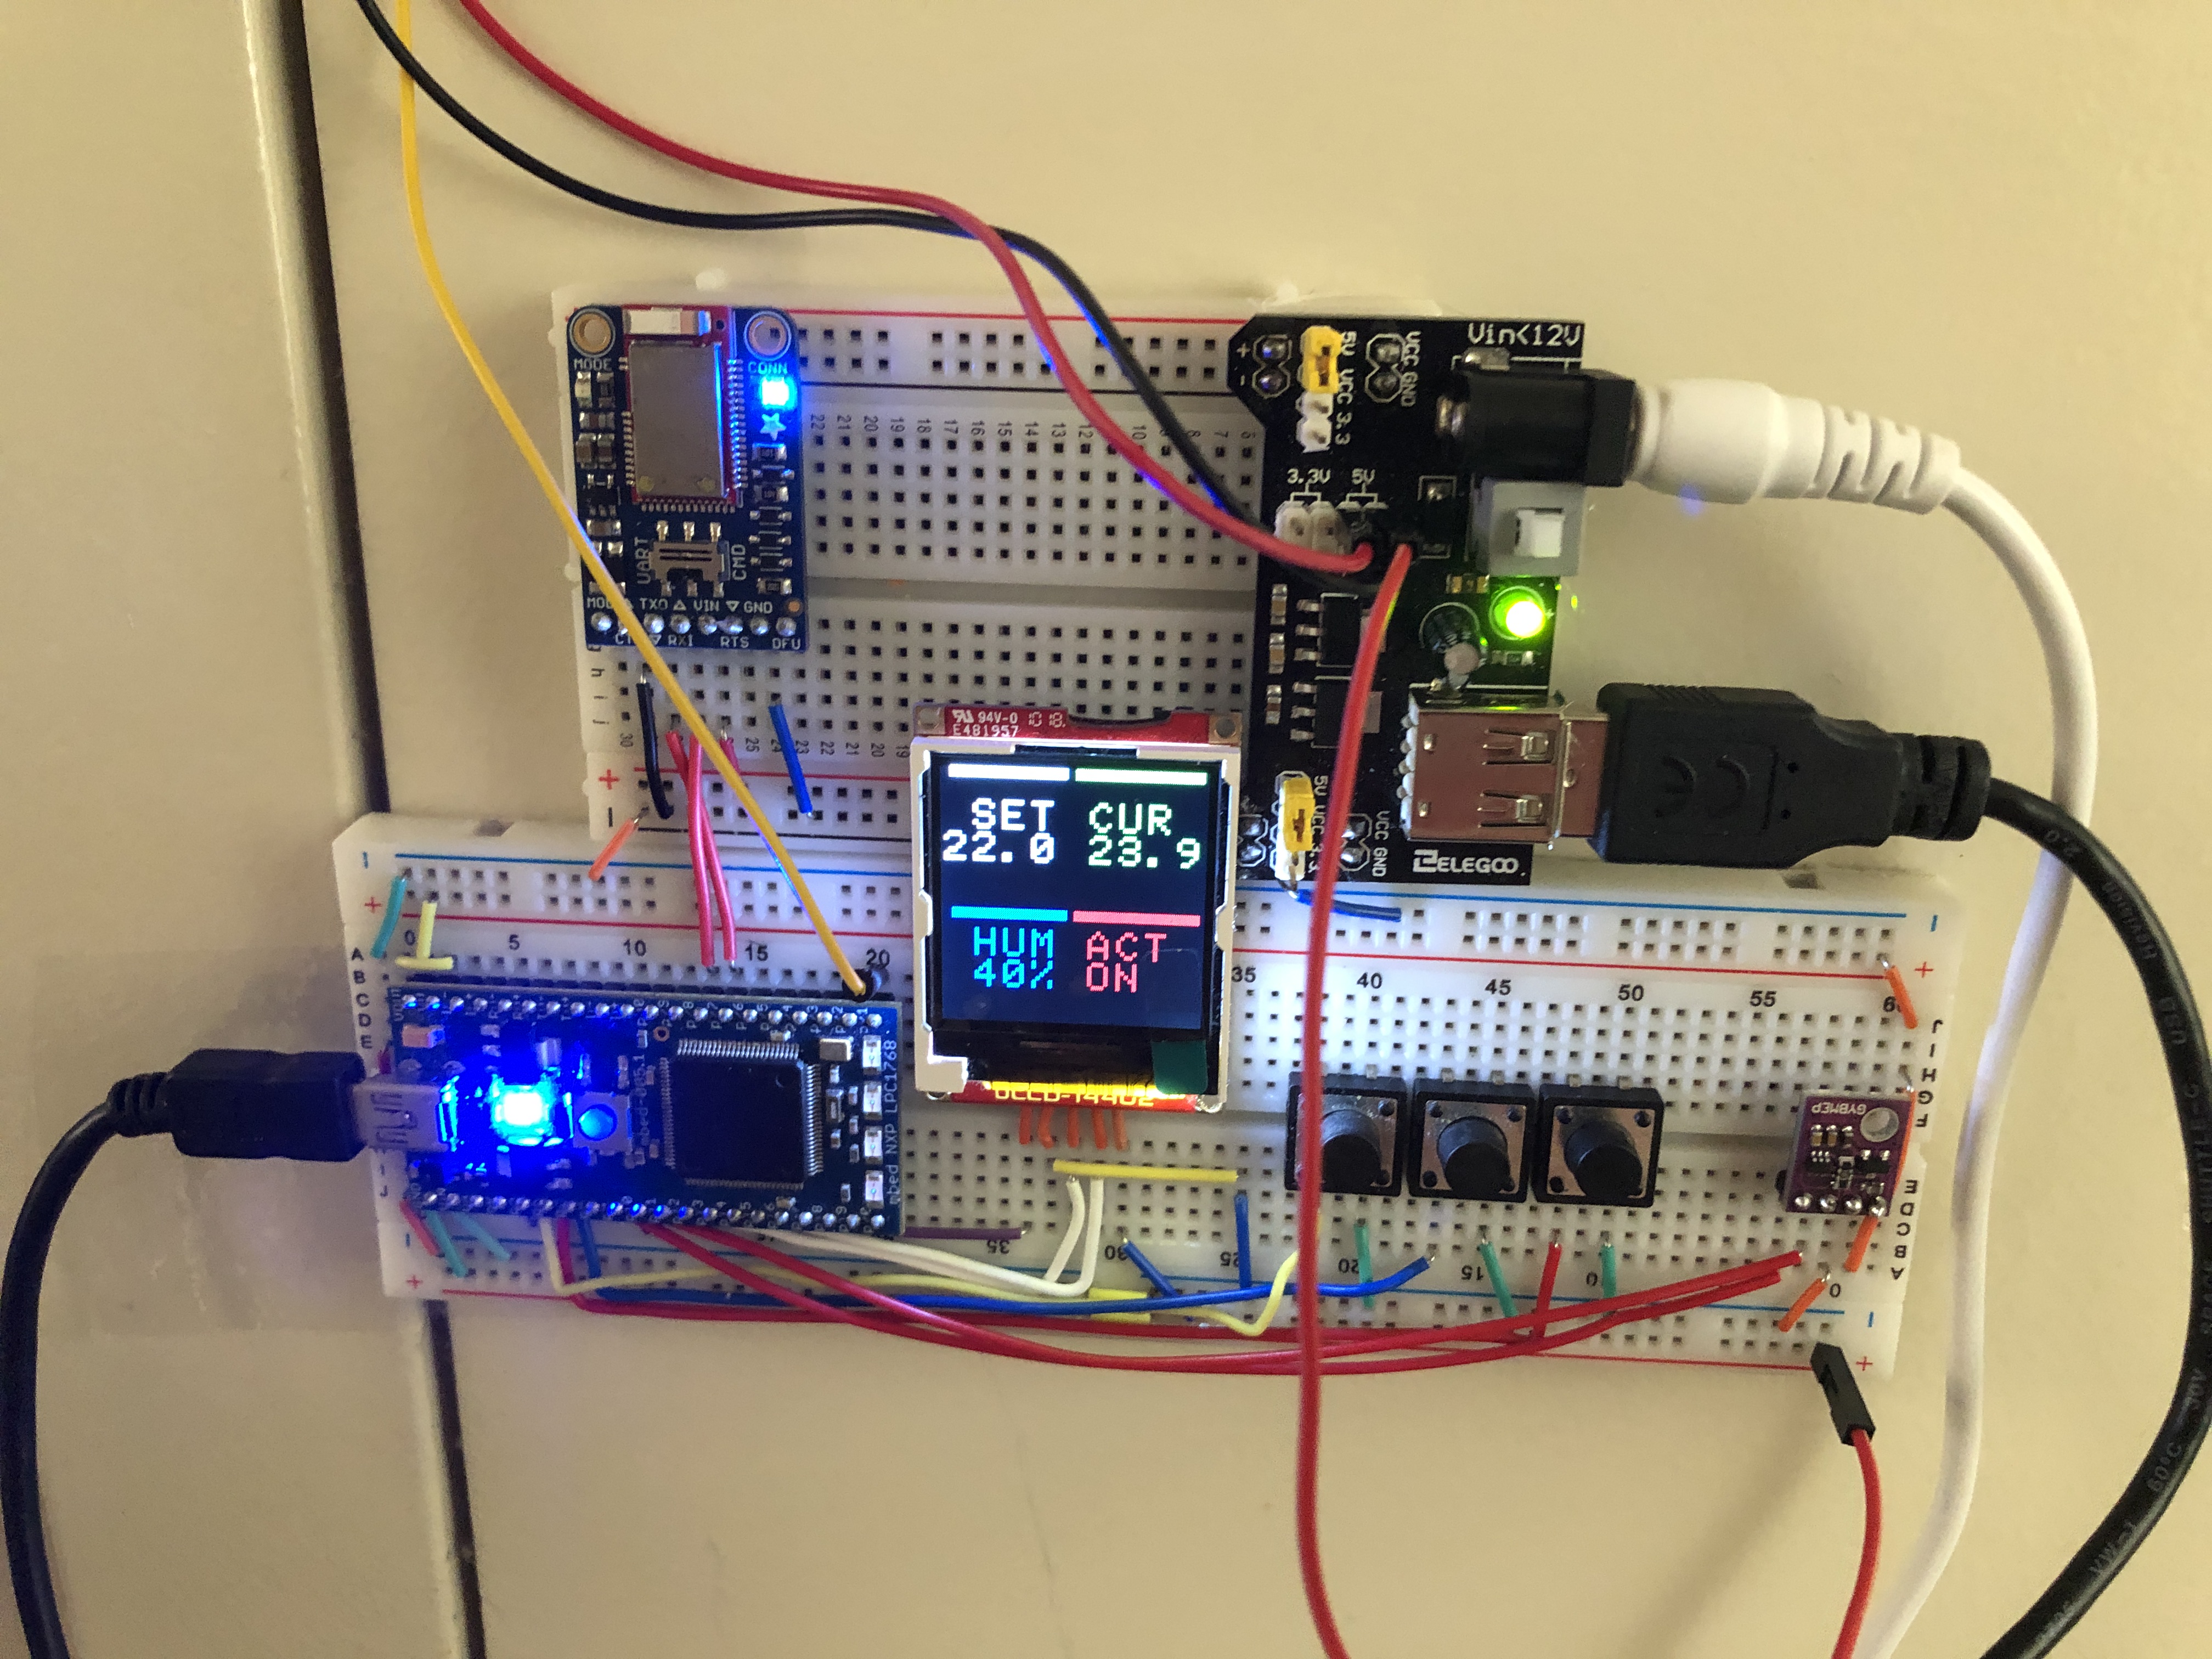
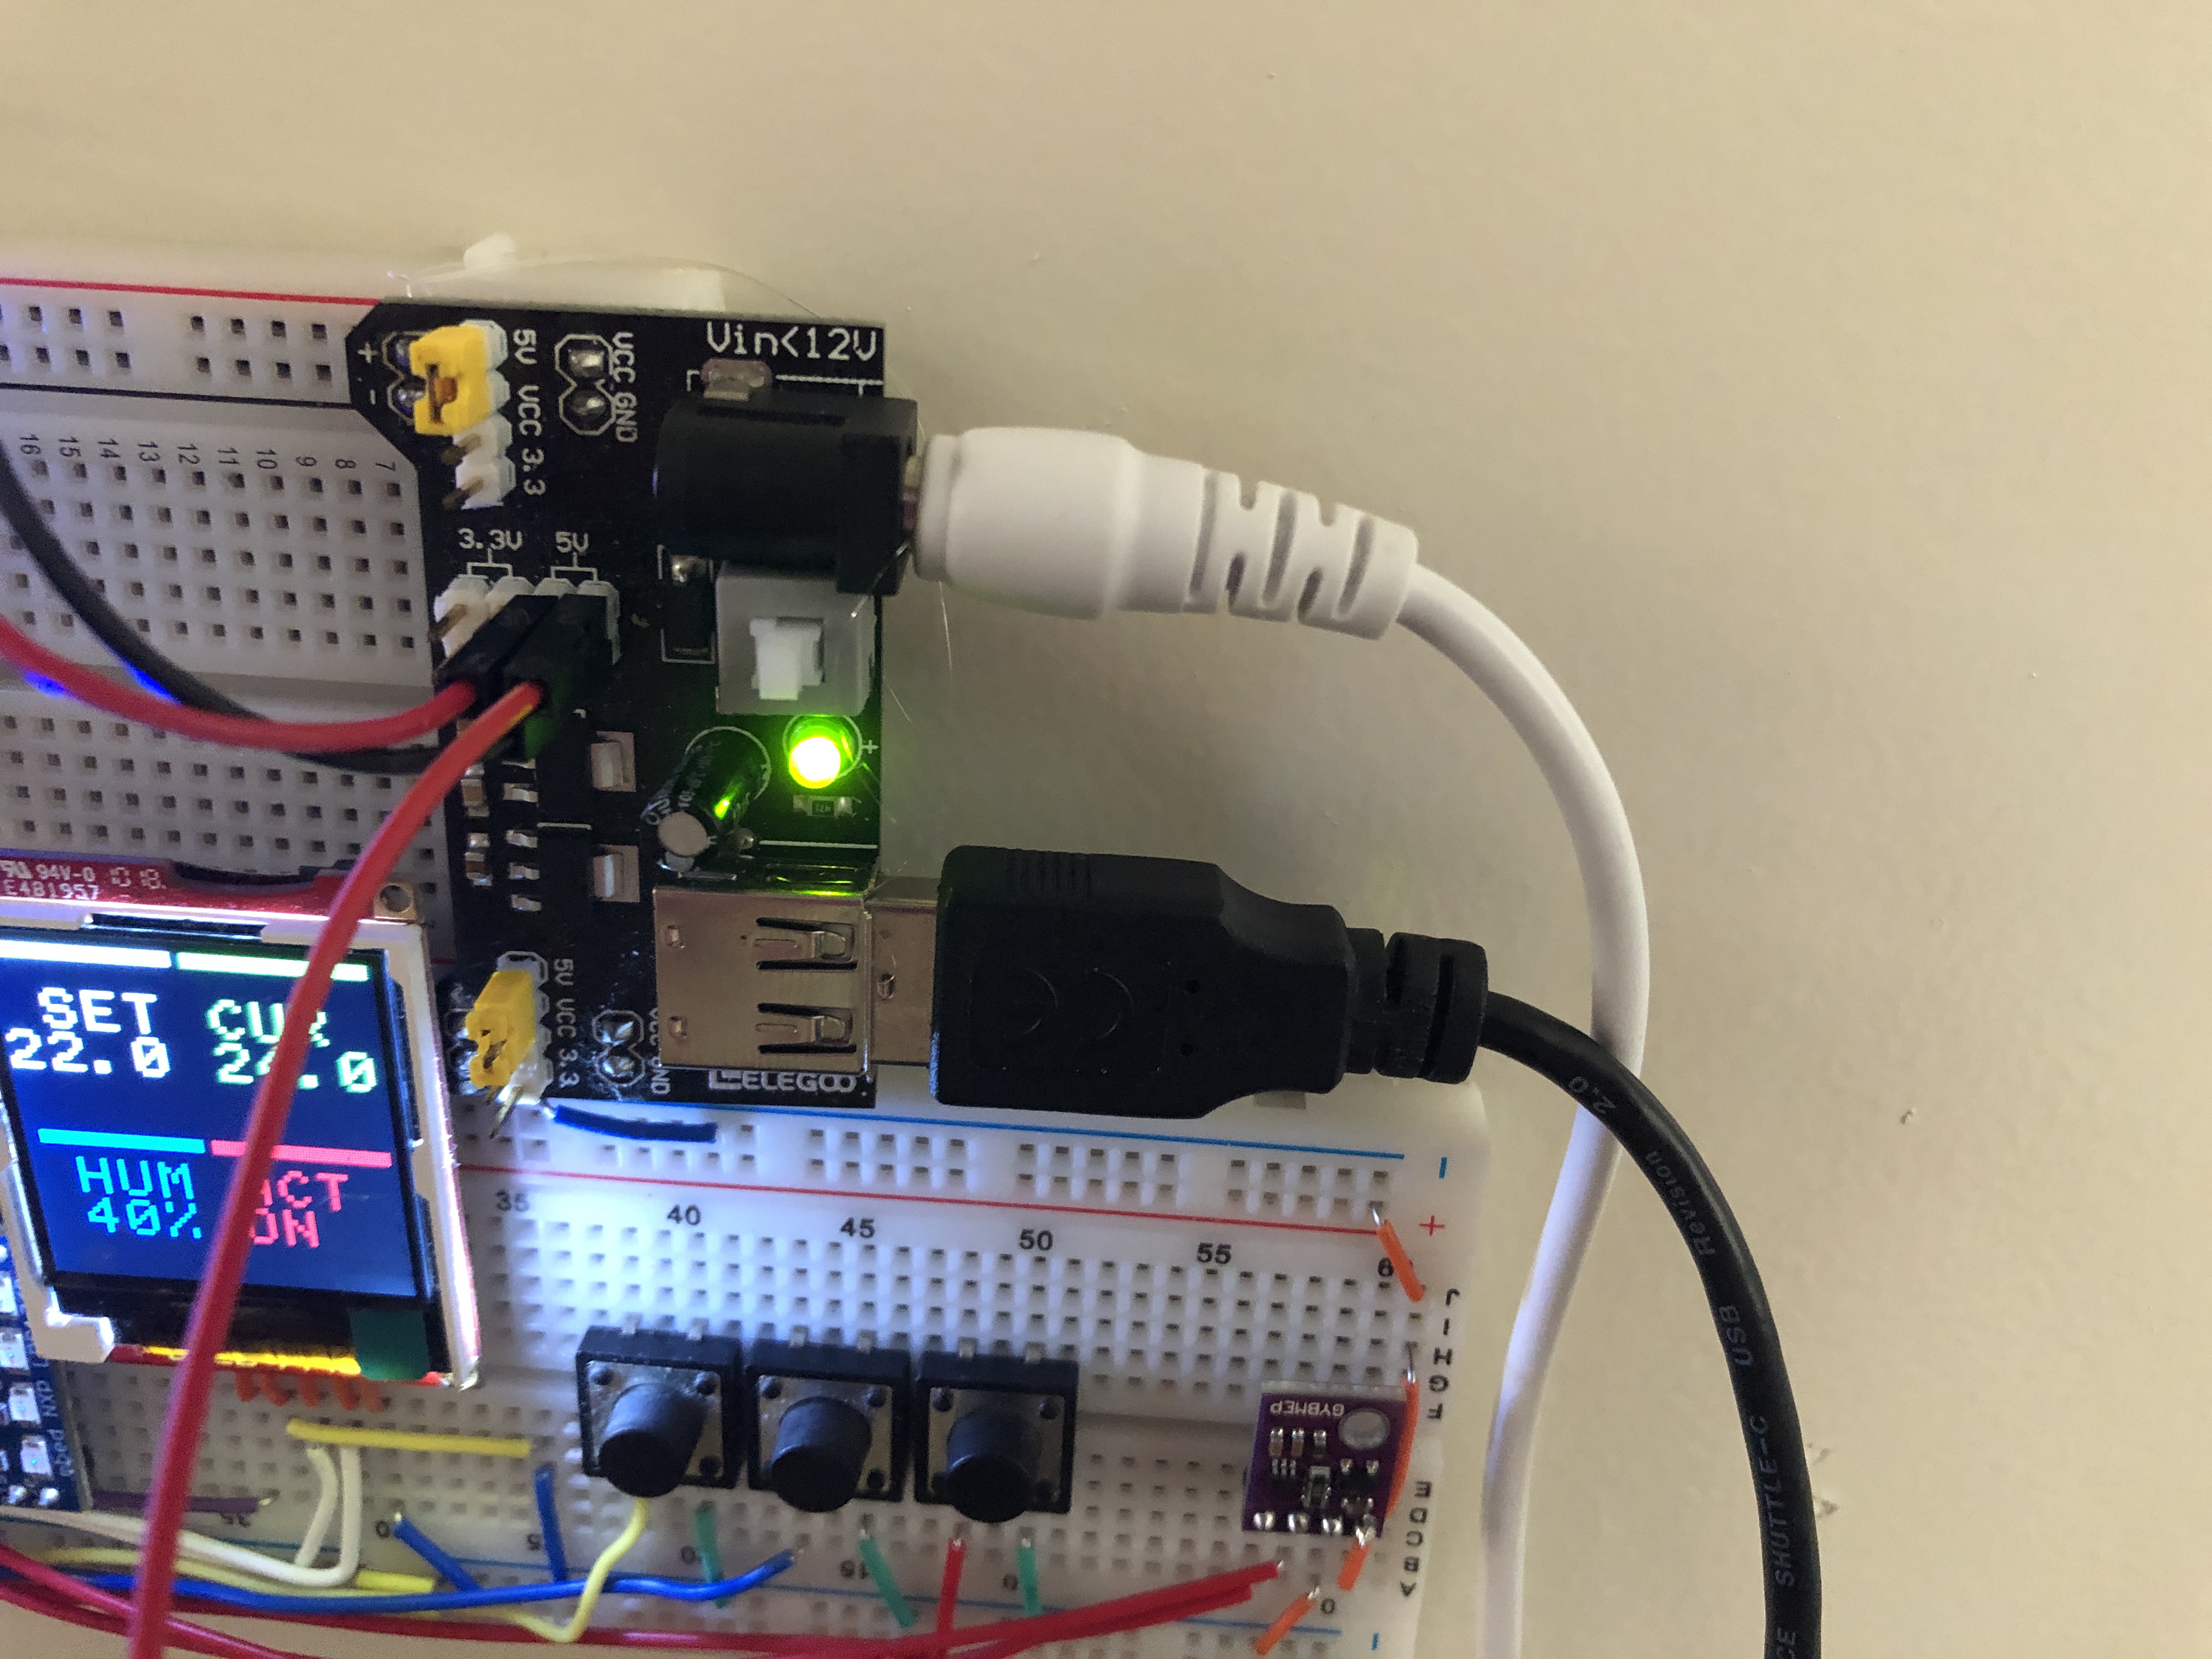
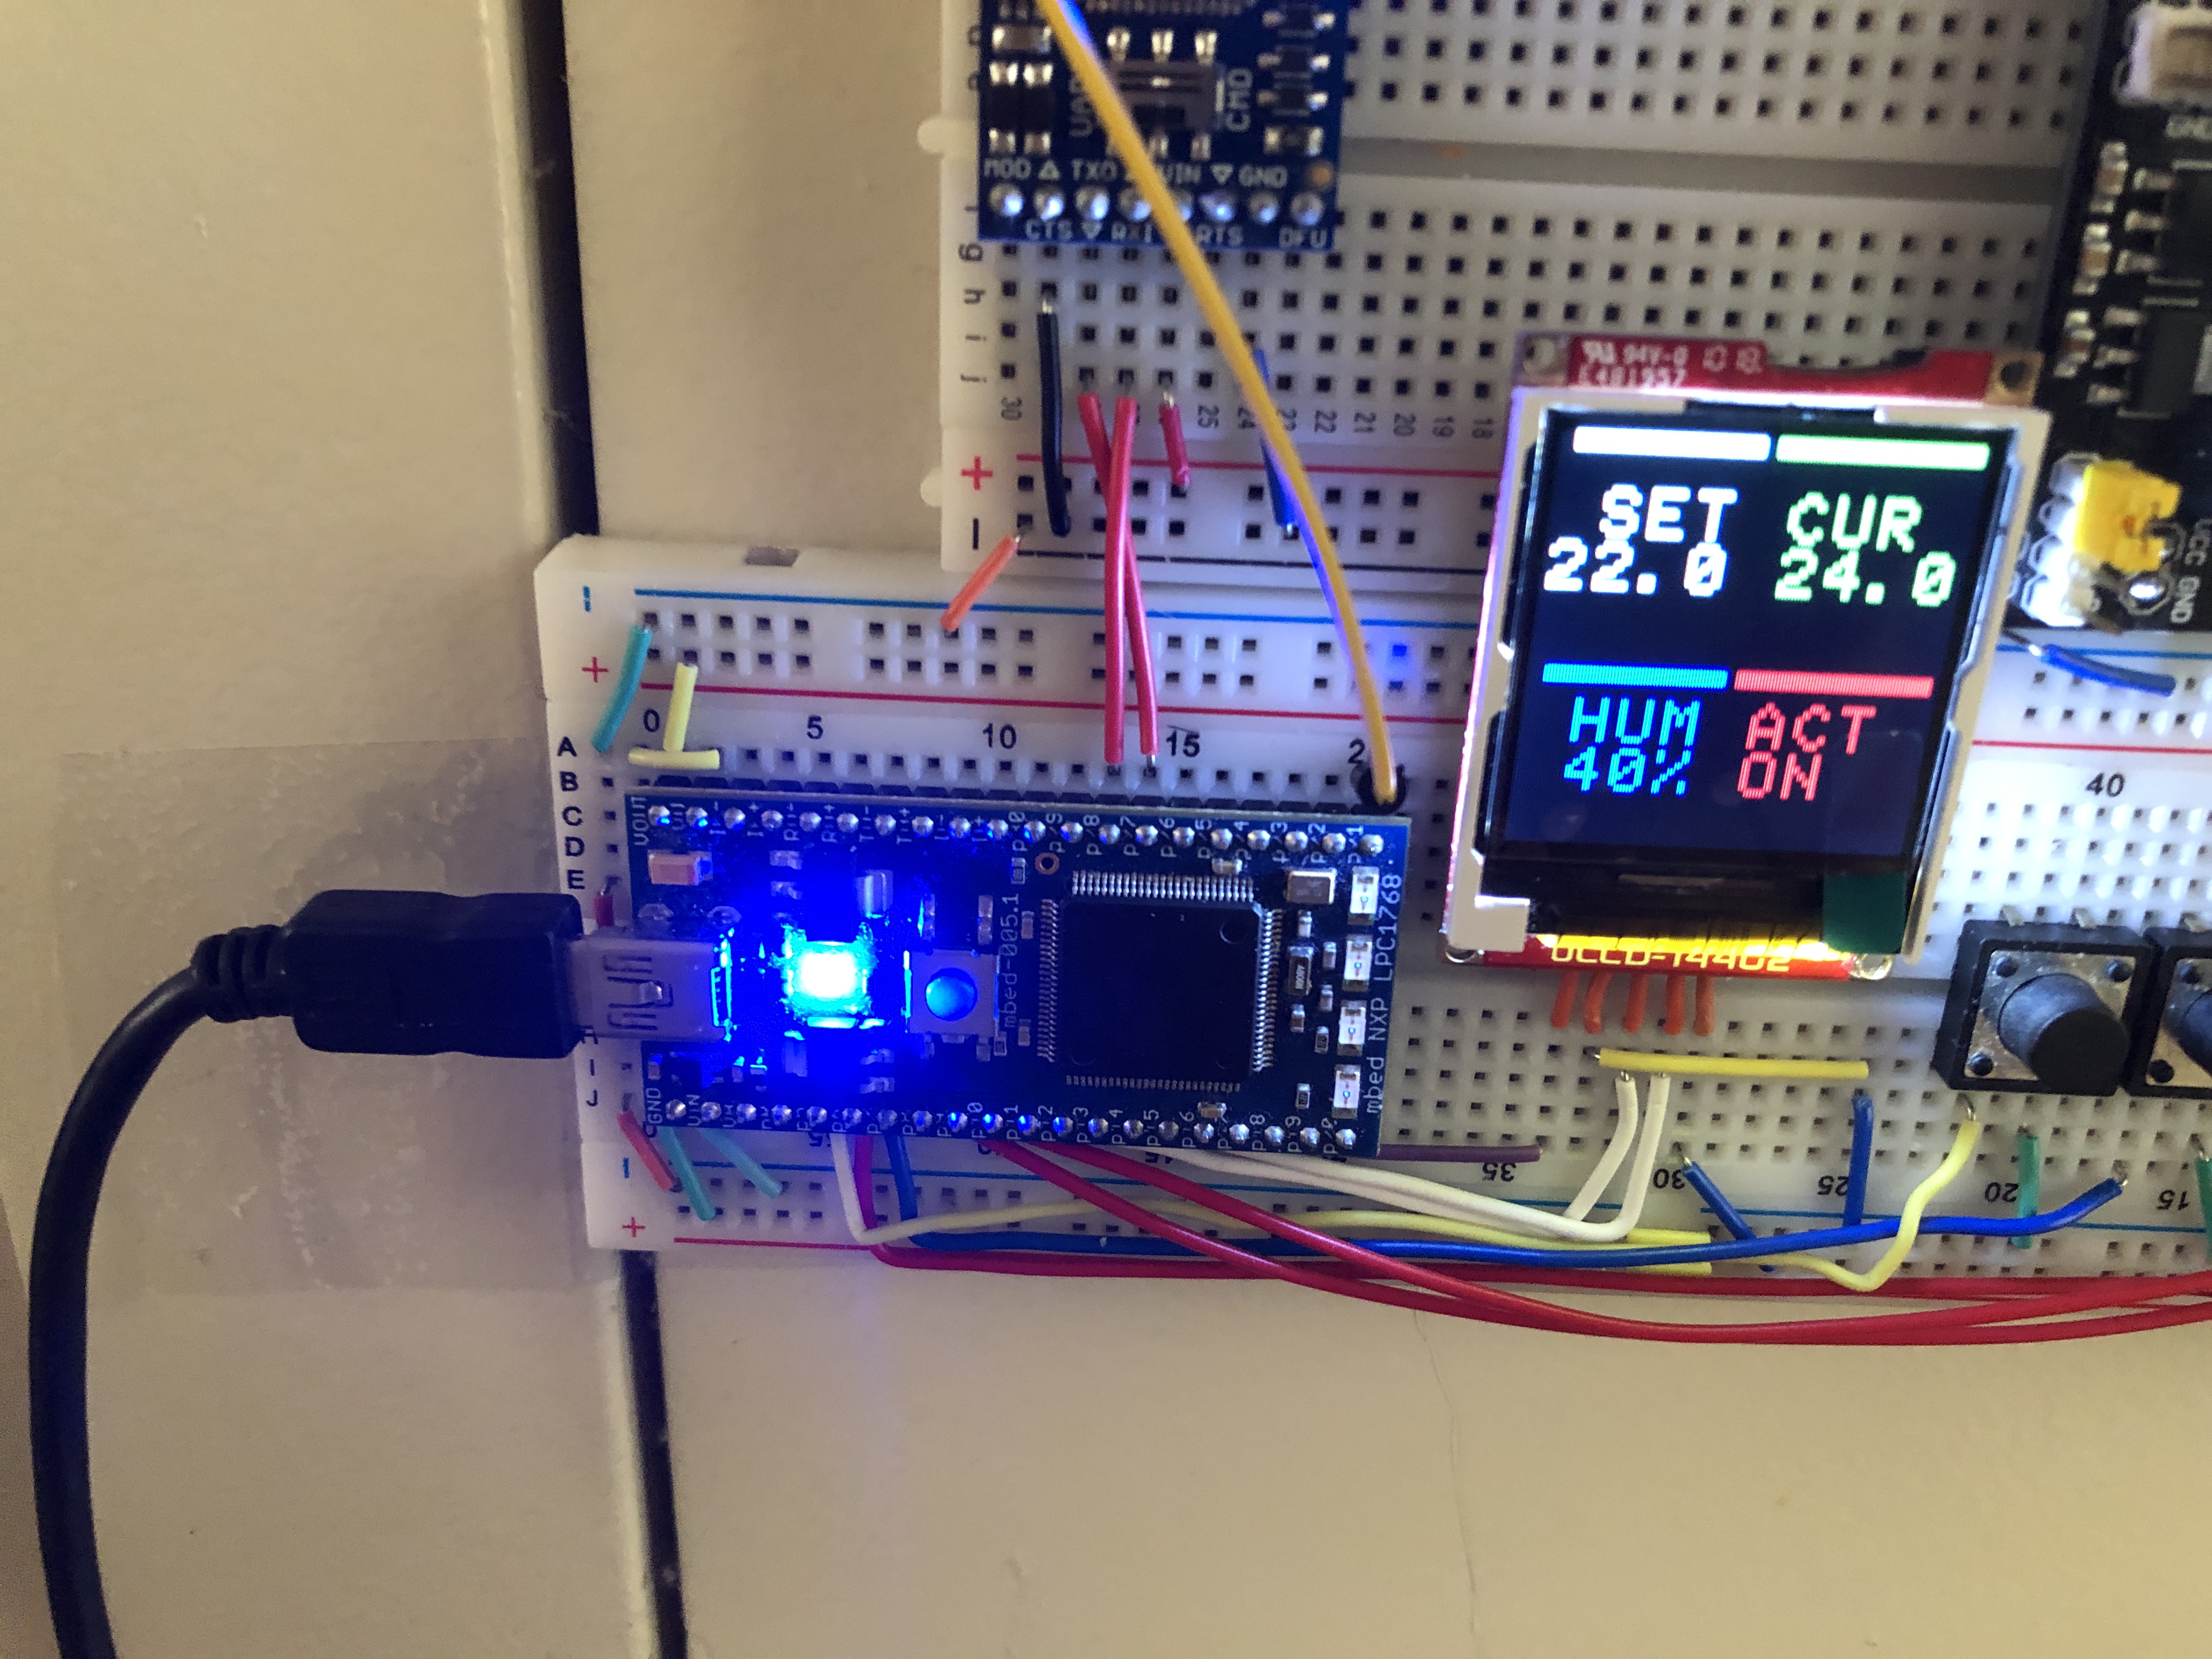
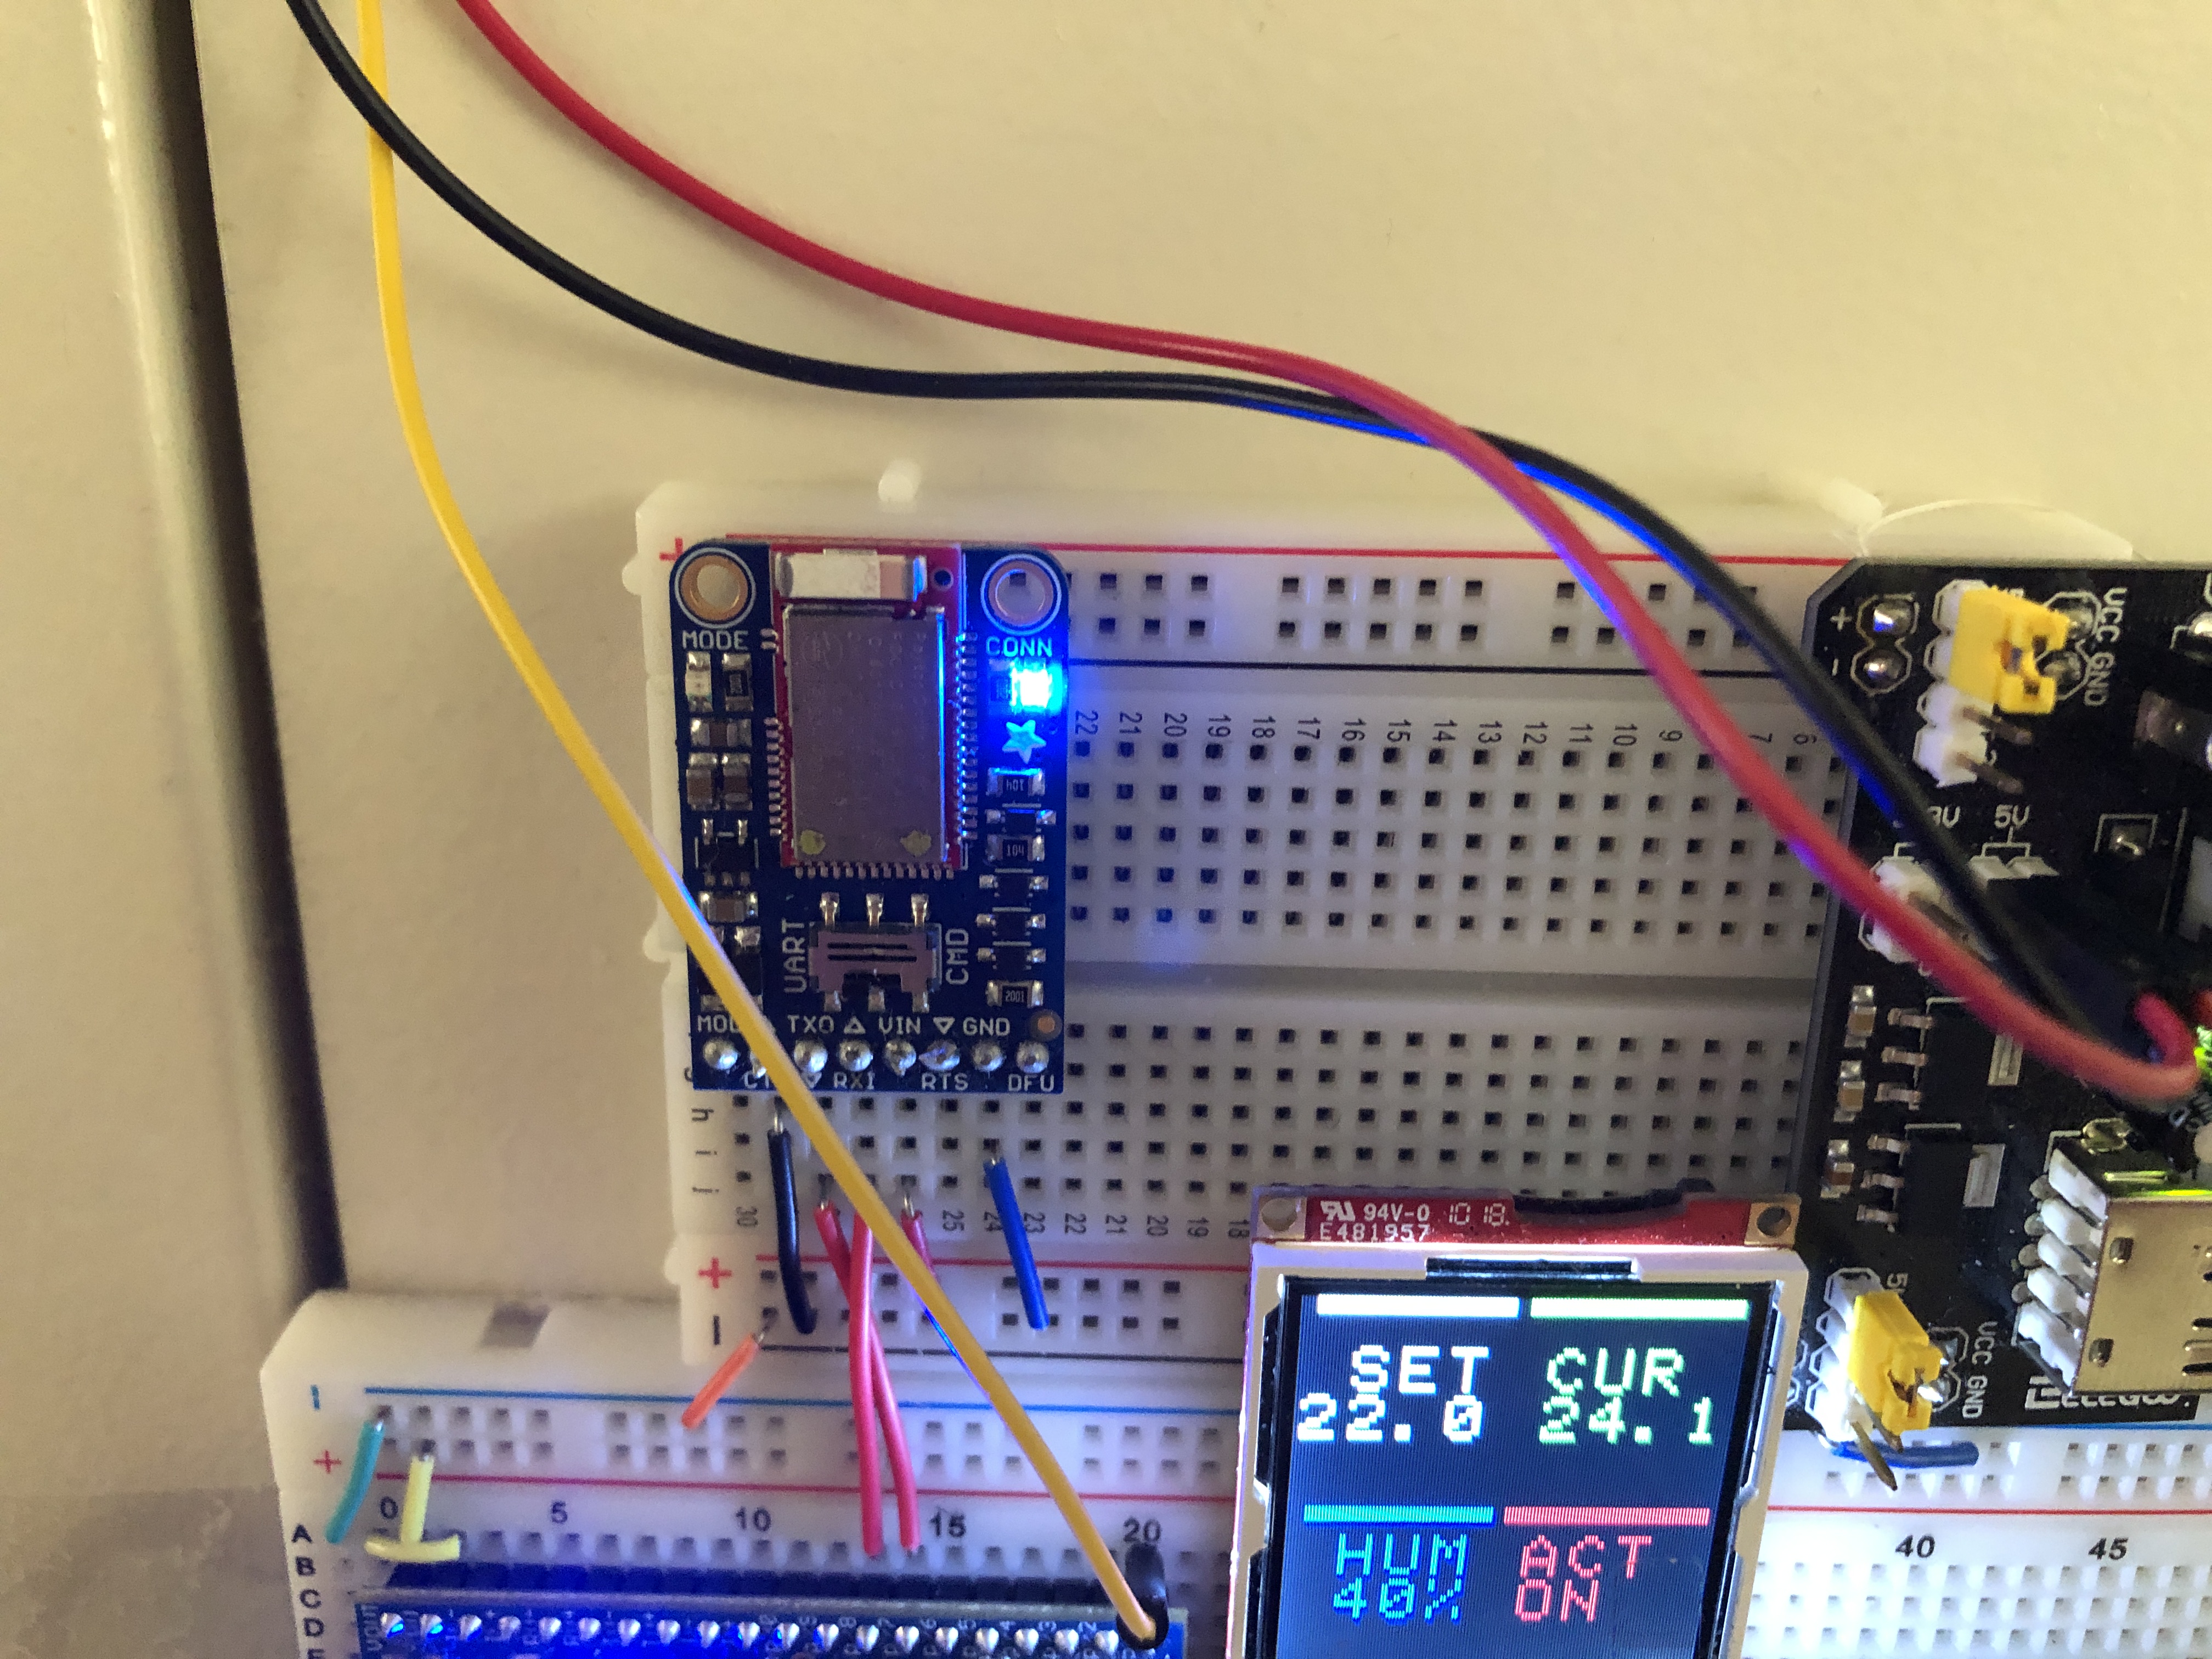
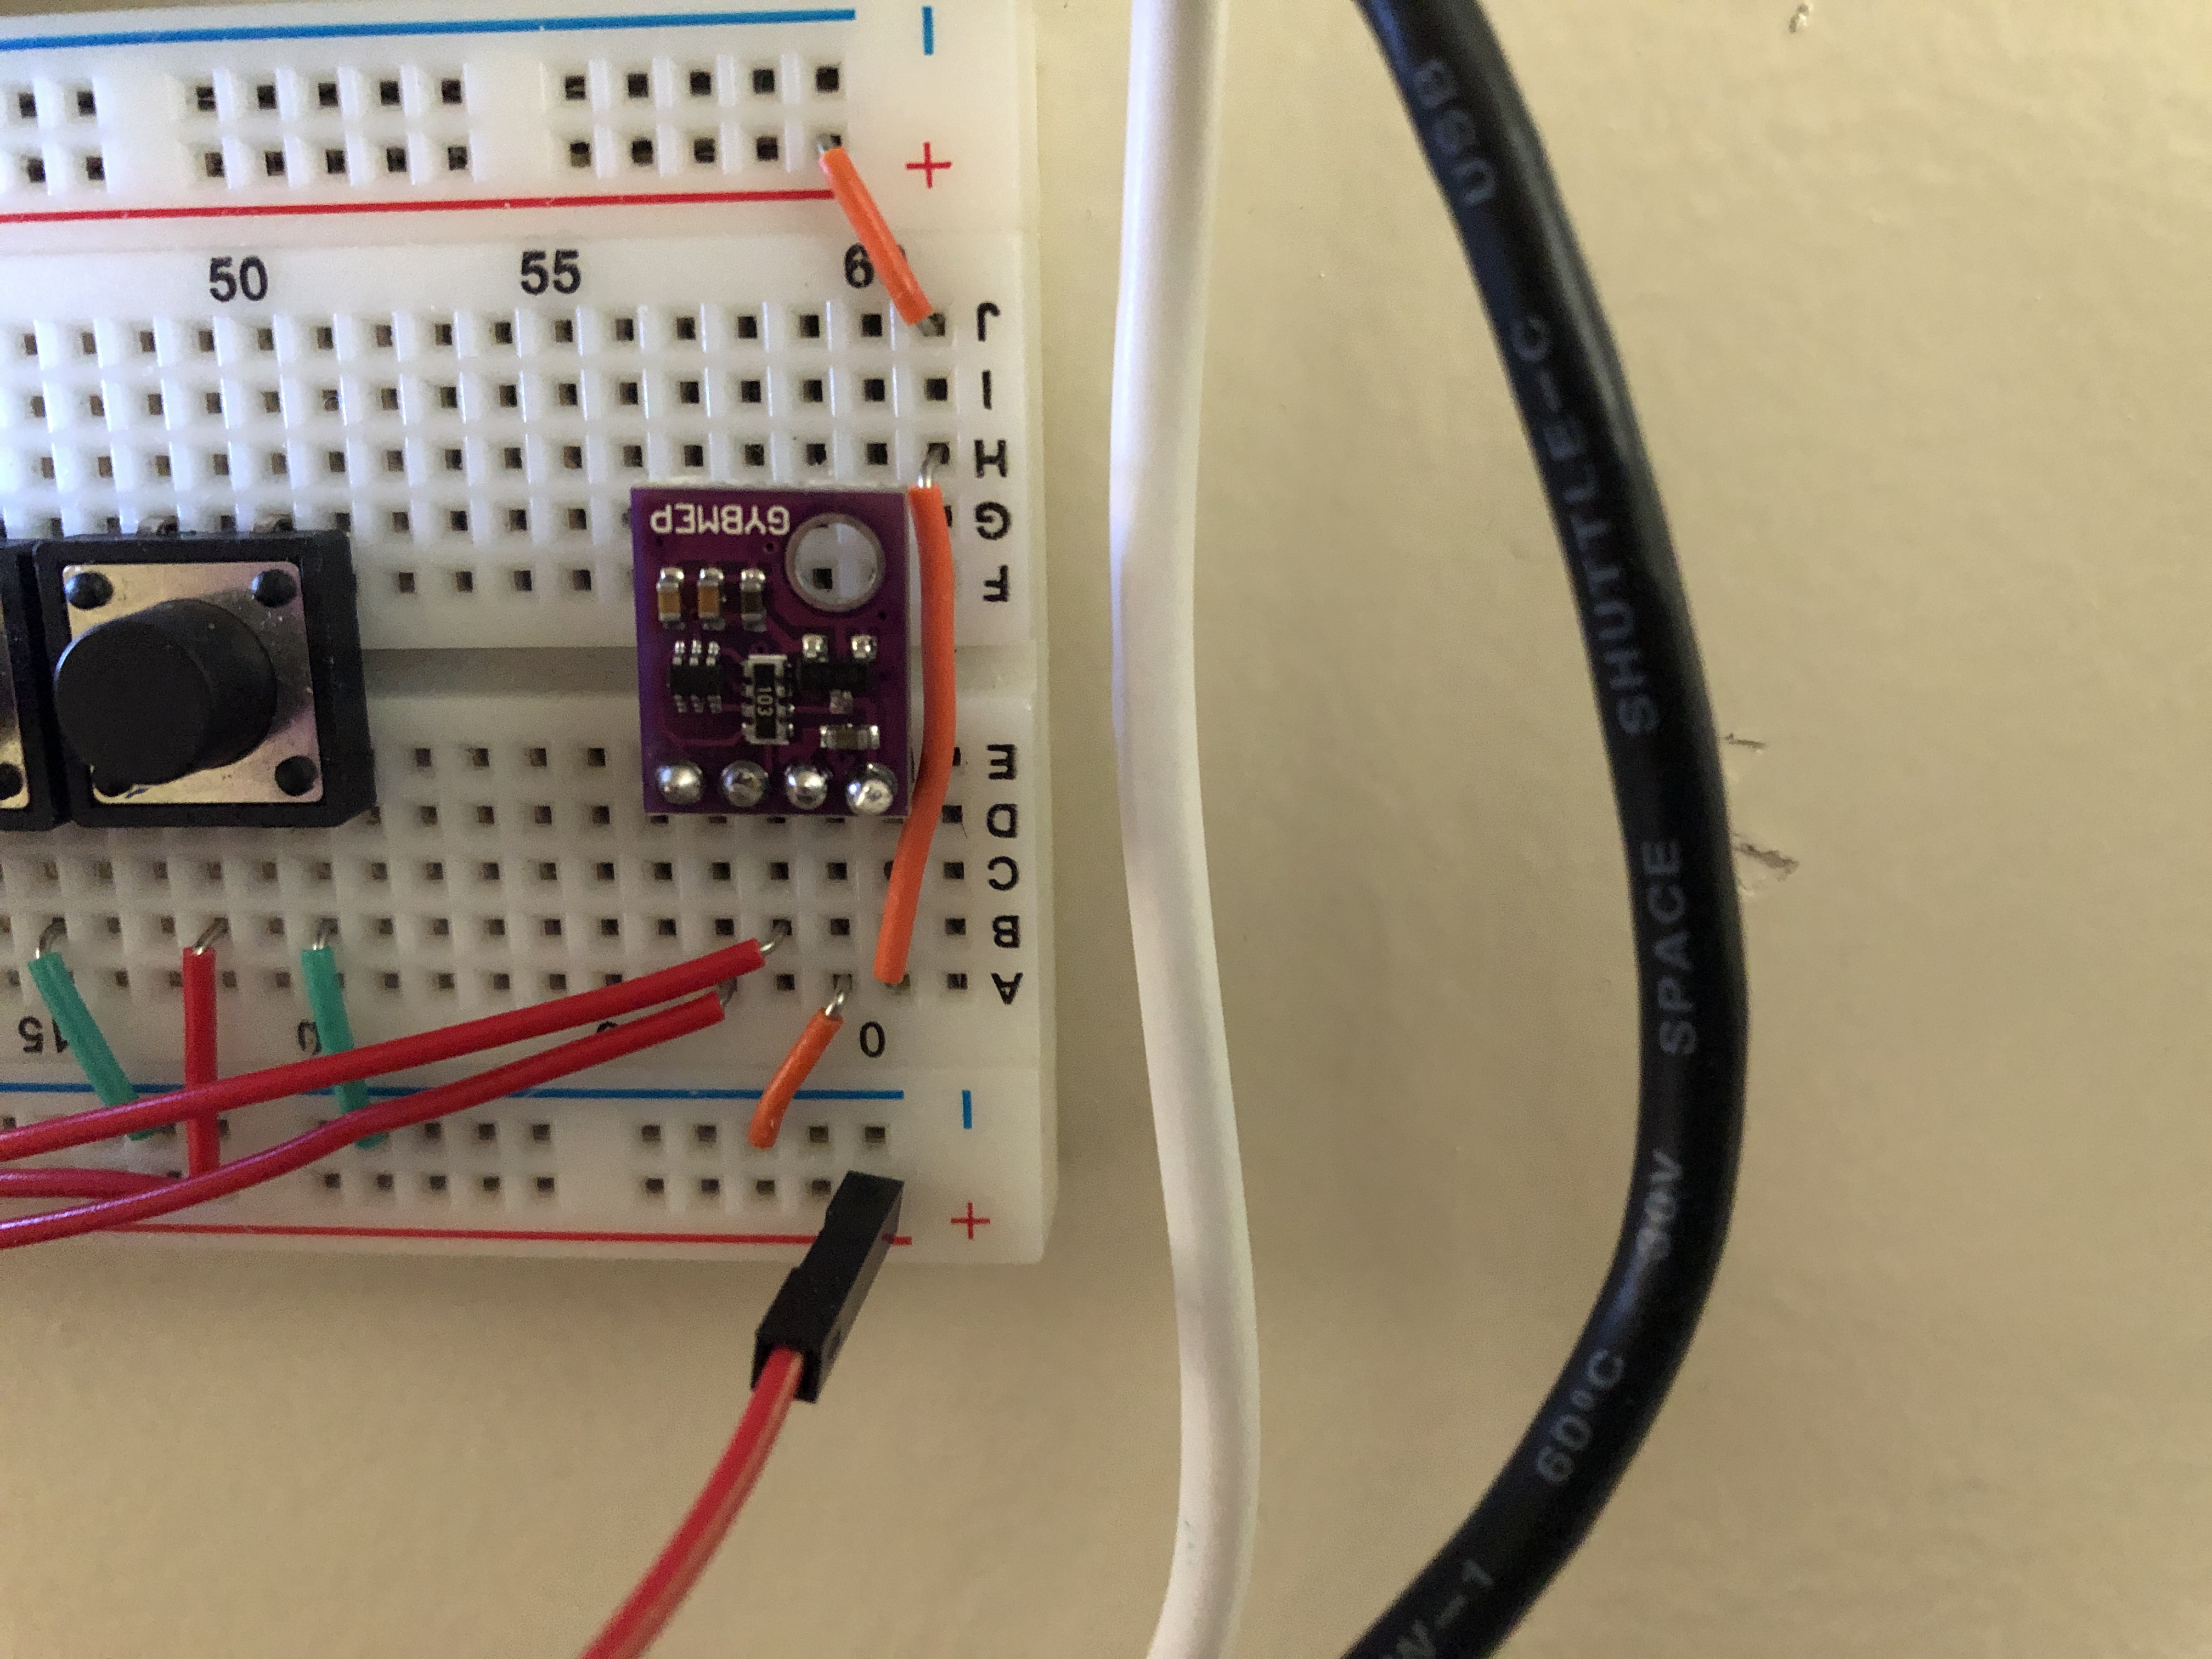
Parts List
-
Microcontroller – MBED
-
Display – uLCD-144G2
-
Thermometer – BME 280
-
Remote Control – Adafruit Bluefruit and companion smartphone app
-
Rotation Actuator – HITEC HS-422 Servo
-
Power Supply – Arduino power supply module (Containing Dedicated Servo power pins and oen USB 5V output for MBED)
Source Code
Github Source Code Link: https://github.com/CPA872/ECE-4180-Final-Project
Mbed Repository Page Link: https://os.mbed.com/users/cx872/code/4180-final_project/
#include "mbed.h"
//#include "DHT.h"
#include "uLCD_4DGL.h"
#include "rtos.h"
#include "PinDetect.h"
#include "Servo.h"
#include "BME280.h"

uLCD_4DGL lcd(p13,p14,p19); // serial tx, serial rx, reset pin;
//DHT dht(p18, DHT22);
PinDetect bt1(p5);
PinDetect bt2(p7);
PinDetect bt3(p6);
Servo servo(p21);
Mutex lcd_mutex;
RawSerial blue(p28, p27);      //Bluetooth Module
BME280 bme(p9, p10);


float humidity;
volatile float set_temp;
float curr_temp;
volatile bool AC_on;

// two interrupts for updating the set temperature
void increment_temp() {
    if (set_temp <= 29.5)
        set_temp += 0.5;
}

void decrement_temp() {
    if (set_temp >= 16.5)
        set_temp -= 0.5;
}

// thread 1, for updating the temperature printout on LCD
void temp_update() {
     while (1) {
         lcd_mutex.lock();
            lcd.color(WHITE);
            lcd.set_font_size(2, 2);
            lcd.locate(0, 2);
            lcd.printf("%.1f ", set_temp);
        lcd_mutex.unlock();

        Thread::wait(500);
    }
}

// thread 2, for comparing temperature and controlling the servo
void servo_control() {
    while (1) {
        if (curr_temp >= set_temp + 1.0f) {
            servo = 1;
            lcd_mutex.lock();
                lcd.locate(5, 6);
                lcd.color(RED);
                lcd.printf("ON ");
            lcd_mutex.unlock();
//            Thread::wait(60 * 1000);  // lock the action for at least 1 minute
            continue;
        }

        if (curr_temp <= set_temp - 1.0f) {
            servo = -1;
            lcd_mutex.lock();
                lcd.locate(5, 6);
                lcd.color(RED);
                lcd.printf("OFF");
            lcd_mutex.unlock();
        }

        Thread::wait(1000);
    }
}

// thread 3, for monitoring bluetooth device and update temperature
void bluetooth_control() {
    while (1) {
        if (blue.readable()) {
            printf("blue is readable\n");
            if (blue.getc() == 's') {
                if (blue.getc() == 'e') {
                    if (blue.getc() == 't') {
                        if (blue.getc() == ' ') {
                            printf("here!\n");
                            char msg[5];
                            msg[0] = blue.getc();
                            msg[1] = blue.getc();
                            msg[2] = blue.getc();
                            msg[3] = blue.getc();
                            msg[4] = '\0';

                            sscanf(msg, "%f", &set_temp);
                            printf("%s", msg);

                        }
                    }
                }
            }
        }
    }
}

int main() {
    servo = 0;
    blue.baud(9600);

    bt1.mode(PullUp);
    bt2.mode(PullUp);
    bt3.mode(PullUp);
    bt1.attach_deasserted(&increment_temp);
    bt2.attach_deasserted(&decrement_temp);

    bt1.setSampleFrequency();
    bt2.setSampleFrequency();
    bt3.setSampleFrequency();

    set_temp = 25;
    /////////////////////////
    lcd.filled_rectangle(5, 0, 60, 4, WHITE);
    lcd.filled_rectangle(65, 0, 125, 4, GREEN);
    lcd.filled_rectangle(5, 70, 60, 74, BLUE);
    lcd.filled_rectangle(65, 70, 125, 74, RED);
    /////////////////////////
    lcd.text_width(2);
    lcd.text_height(2);
    lcd.locate(0, 1);
    lcd.color(WHITE);
    lcd.printf(" SET ");
    lcd.color(GREEN);
    lcd.printf("CUR");
    lcd.locate(0, 5);
    lcd.color(BLUE);
    lcd.printf(" HUM ");
    lcd.color(RED);
    lcd.printf("ACT");

    Thread t1;
    Thread t2;
    Thread t3;

    t1.start(&temp_update);
    t2.start(&servo_control);
    t3.start(&bluetooth_control);

    float temp_f;
    int code;

    // main thread, for updating temperature and humidity printouts on LCD
    while (1) {
        curr_temp = bme.getTemperature();
        humidity = bme.getHumidity();

        lcd_mutex.lock();
            lcd.locate(5, 2);
            lcd.color(GREEN);
            lcd.printf("%.1f", curr_temp);

            lcd.locate(0, 6);
            lcd.color(BLUE);
            lcd.printf(" %.0f%% ", humidity);
        lcd_mutex.unlock();

        Thread::wait(2000);
    }
}
Schematic
Below is the Schematic for our project.
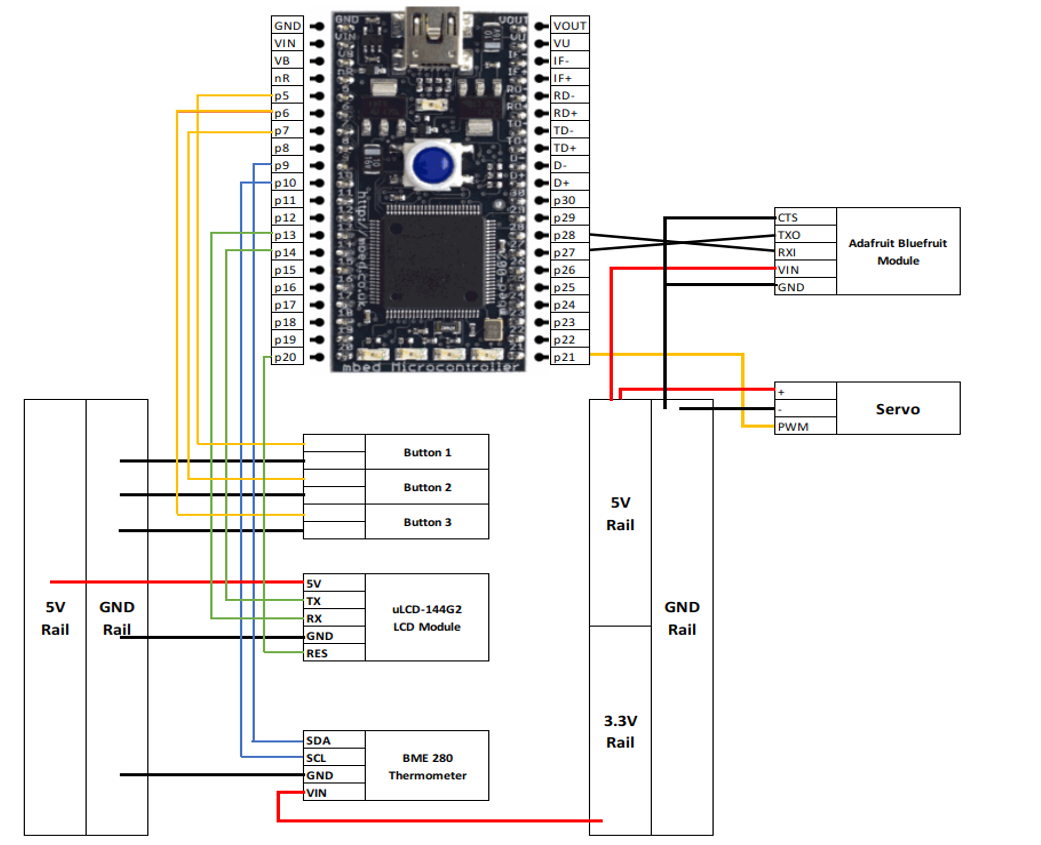
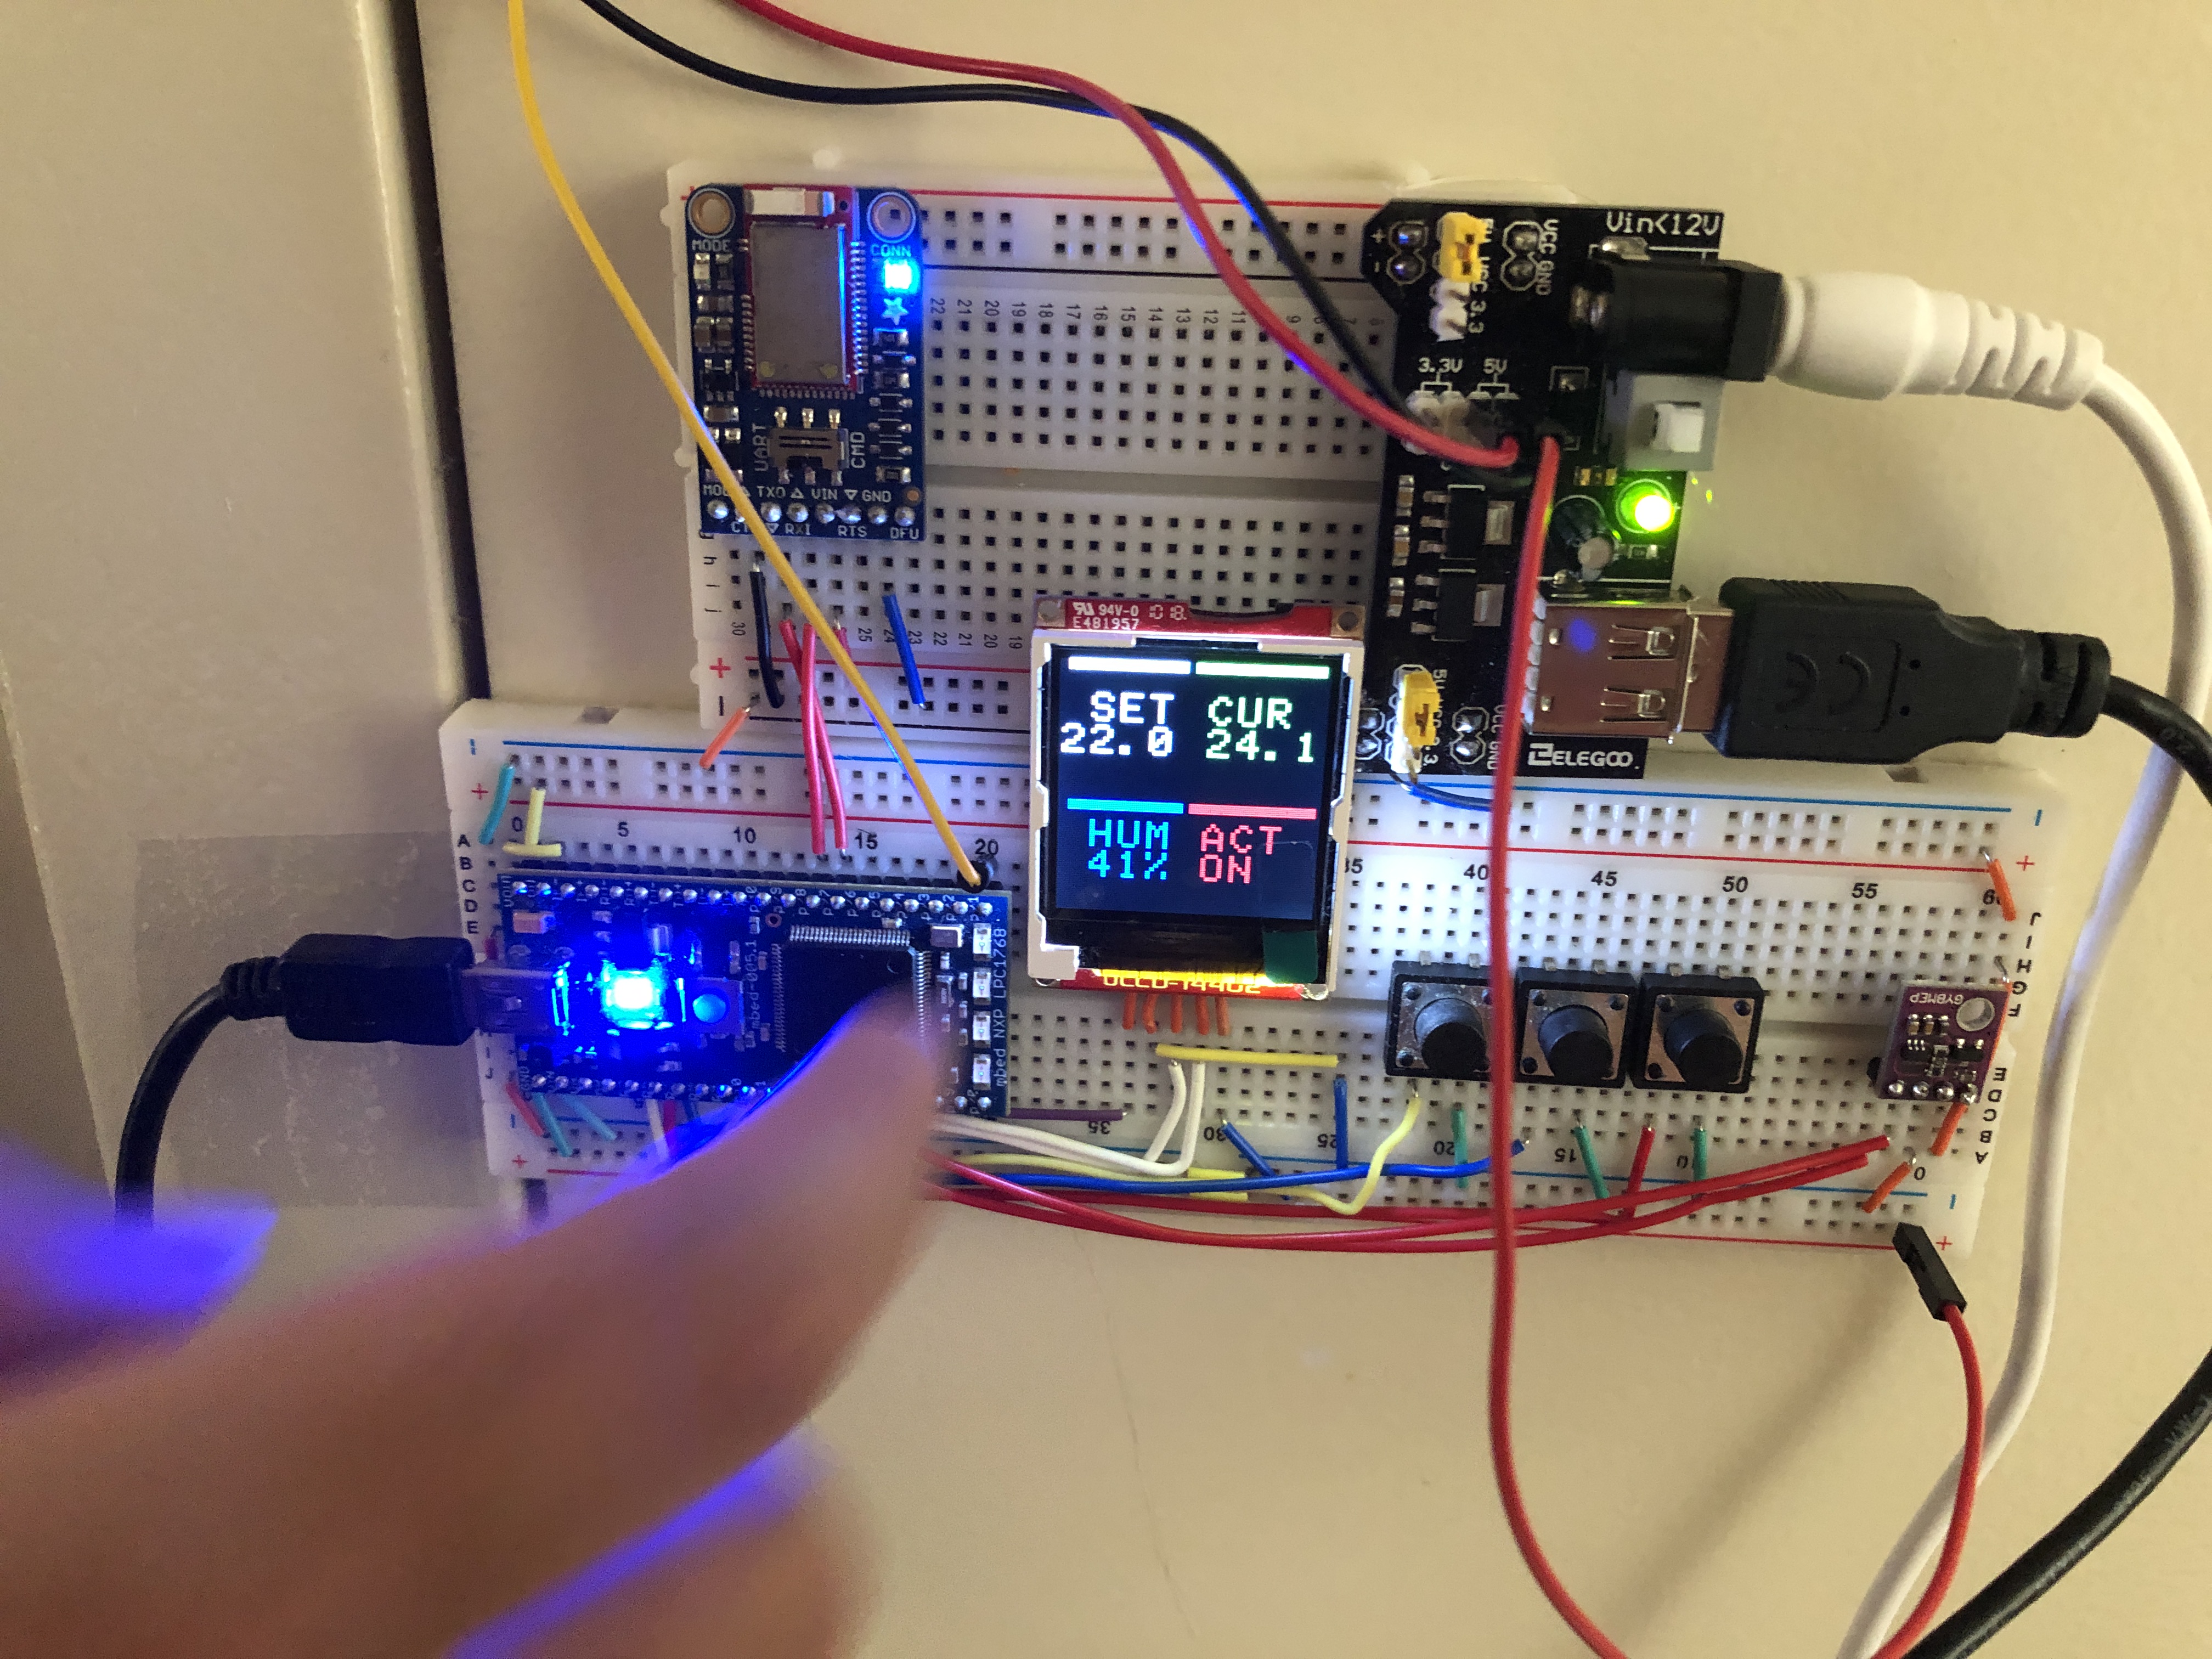
Image Gallery
Videos
Embedded Presentation Video
Embedded Demo Video
Future Work
We would like to actually use this design in our future apartment (8th Street East)
The servo needs to be more firmly fixed onto the surface
May consider replacing the power supply module because the regulator on it is very hot during operation
Can add a “force on” feature using the 3rd button that turns on the HVAC without changing the set temperature